


This article breaks down how to embed Analytics on the Most Common Web Platforms: WordPress, Wix, Squarespace & Shopify
The tutorial assumes that your Analytics account has already been set up. If you have yet to do so, check out our article on just that, here.
The success of any website depends on attracting the right visitors and delivering them compelling and useful content. To evaluate success and tailor your offering you need to collect data that shows how visitors are arriving at and using your website.
Google Analytics is the most widely used website analytics service, which is offered free by Google. Once you’ve activated a Google Analytics account and added its tracking code to the pages of your website, Google Analytics can capture data from every visitor to your site, according to the parameters you establish.
Here we look at four of the most popular website platforms: WordPress, Wix, Squarespace and Shopify – and tell you how to set up Google Analytics on each.
Retrieving your website’ s tracking code from Google Analytics
The first step is to retrieve a tracking code in Google Analytics. To do this, just log in to your Google Analytics account and set up analytics tracking for the website of your choice. Select “Website” on the setup screen and then enter its name and URL under “Property.” This tells Google Analytics what site to track.
Click the “Get Tracking ID” button. Google will generate a unique tracking code that you can add to every website page that you want to track. Copy this code to add it to your site. Once installed, this tracking ID allows Google to search these pages for the relevant data.
Next Step: Installing your tracking code to begin seeing how well your website performs.
There are actually a number of distinct ways to install the GA Tracking code, depending on what platform your website was built in and how your website was put together. We have done our best to give you multiple options, but you may find that your set up is too custom or too complicated. Do your best and if you get stuck, give your local website marketing professional a call.
Contents (skip to the appropriate section)
Section AA is optional, but we included it first as it is option that can be used across any of the web platforms. The reason we have left it as optional, is that it adds an extra few steps and additional complexity to the set up. The advantage is that Google Tag Manager (GTM) is a handy tool that makes keeping tracking of all your different tracking codes easy and in one place. If you find you have numerous tracking codes and have intermediate technical skills, then give it a go. Otherwise, skip it and go to the section appropriate to your web platform.
Section AA. Using Google Tag Manager (optional)
Section AA. Using Google Tag Manager (GTM) (optional)
All four website platforms allow you to use a free tool that makes it easier to add and update tracking tags within your website. Google Tag Manager can be used to track data in Google Analytics. It will also allow you to track additional things on your site (like outgoing links, Youtube videos etc.).
If you want to use this option for tracking analytics then you need to create a Google Tag Manager Account and install Google Analytics.
You will need to add a container to your account. A container could be a website or an app on iOS or Android platforms. In this case it will be a website, so you can use your website’s domain for the container name.
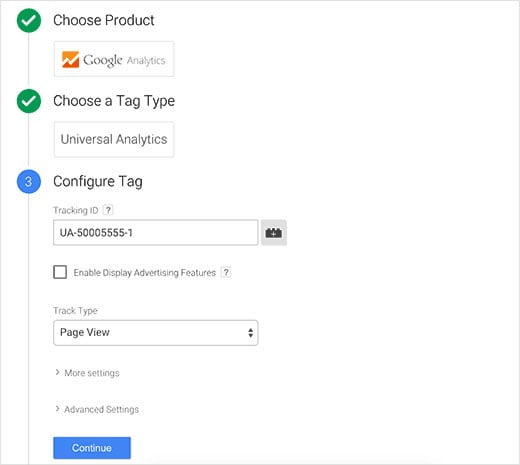
Under “Configure Tag” you input your Google Analytics Tracking ID.
Once you have created a container, Google Tag Manager will show you a tracking code that you need to add into your website. You need to copy this code.
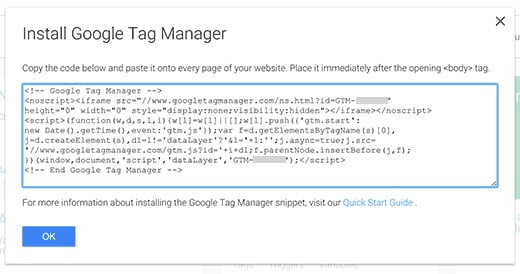
Tags in Google Tag Manager will not go live until you publish the container. After you have successfully embedded Google tags in your website, visit Google Tag Manager dashboard and then click on the “Publish” button.
You can also preview your website and Google Tag Manager will show you the tags fired on each page view.
Adding the Tracking ID to Your Website
A. How to add Google Analytics tracking code on WordPress
There are a few methods to add the Google Analytics tracking code to any WordPress website as follows:
1. Use a Plugin
For new users or those looking for the most convenient option, it is recommended to install a plugin such as MonsterInsights on your WordPress website.
WordPress plugins, handle tasks like setting the tracking ID and customising your settings directly from the plugin itself.
Simply select and install the Google Analytics WordPress plugin of your choice on your website and connect with your Google Analytics account to complete the setup. Paste your tracking ID into the plugin and allow a few hours for Google to begin tracking. Analytics for all specified pages will be reported on your Google Analytics dashboard.
2. Set the Tracking ID Manually
One option for setting the Google Analytics tracking code in your website is to copy your tracking ID and paste it directly into the site’s “functions.php” file in the site’s “wp-content” folder. Once the tracking ID is installed there, it’s added to every page, so that Google can collect data from the entire website.
Another option is to navigate from your WordPress dashboard to “Appearance”, “Editor”. Now click the “header.php” file on the right-hand side below the “Templates” section.
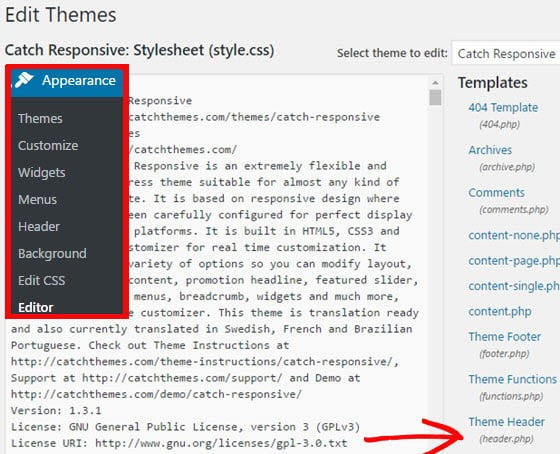
Paste the tracking code you just copied from your Analytics profile before the closing </head> tag.
Then click Update File.
3. Using Google Tag Manager
First thing you will need to do is install and activate Insert Headers and Footers plugin. Upon activation, you need to visit “Settings”, “Insert Headers and Footers”.
Paste your Google Tag Manager code in the header section and click on the save button to store your settings.
B. How to add Google Analytics tracking code on Wix
1. Using Google Analytics ID
It is relatively simple to set up Google Analytics in your Wix website. Go to “Marketing Integrations”, “Google Analytics” and click “Go For It”.
At the right click “Connect Google Analytics” and paste in your “Google Analytics ID”. Make sure that there are no extra spaces before the code.
Select the IP Anonymization checkbox to ensure that Google does not save your site visitors’ IP addresses.
Click Save.
If you have connected multiple domains to your site, make sure to add your Google Analytics code to your primary domain only, rather than your secondary domain(s).
It may take up to one week before you see statistics in your Google Analytics account.
2. Using Google Tag Manager option
Go to “Marketing Integrations”, “Google Tag Manager” and click “Go For It”.
At the right click “Connect Google Tag Manager” and paste in your Google Tag Manager container ID.
Click Save.

C. How to add Google Analytics tracking code on Squarespace
1. Using Google Analytics ID
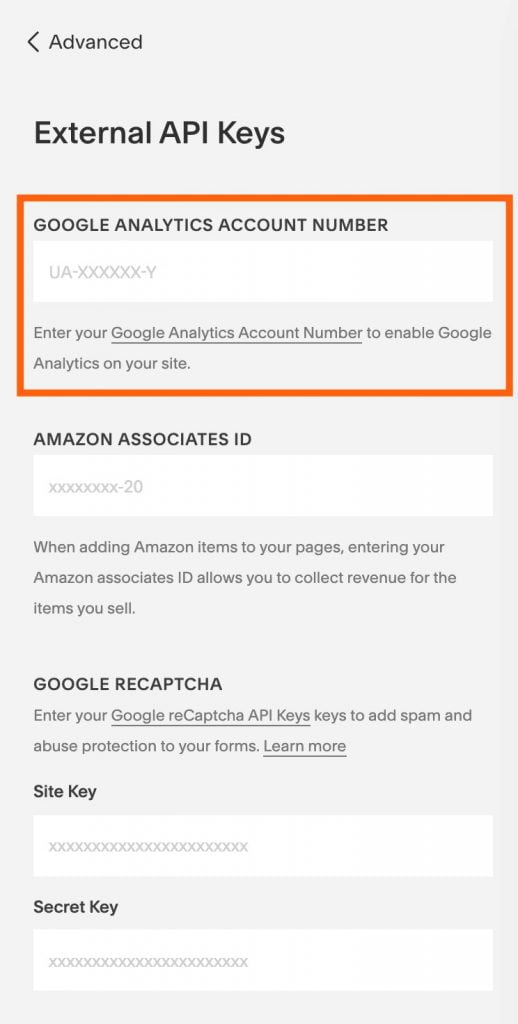
Open your Squarespace account, then open the site you want to add Google Analytics to. In the sidebar, click “Settings”.
Next, click “Advanced”.
Then, click “External API Keys”.
You will now see a text box where you can paste your Google Analytics ID.
2. Set the Tracking ID Manually
Squarespace also has the option to add the entire Google Analytics snippet into the header of your webpage.
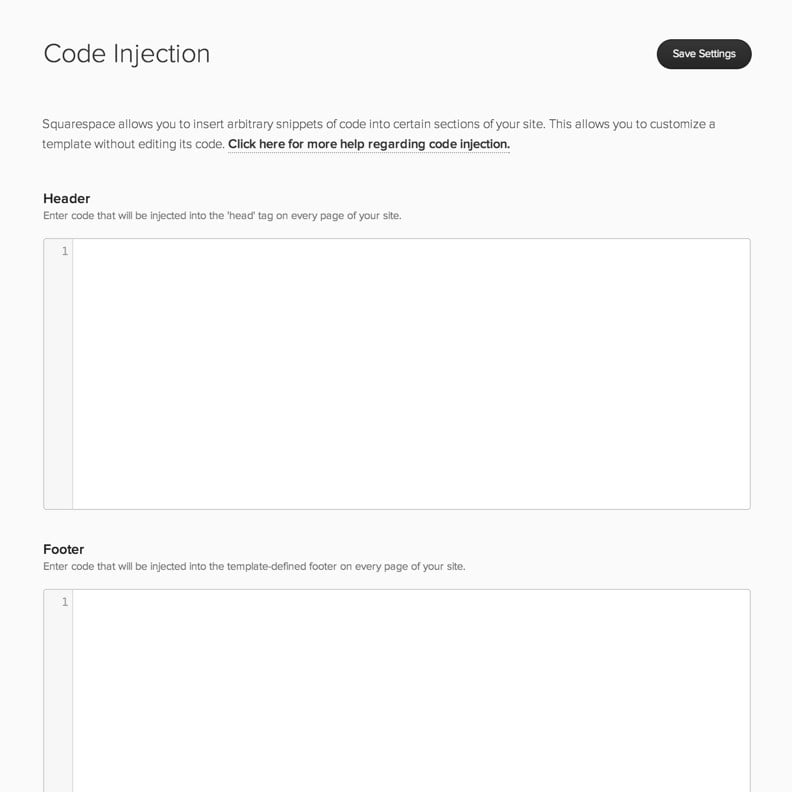
In the home menu navigate to “Settings”, “Advanced”, “Code Injection”.
Copy and paste the entire Google Analytics’ Tracking Code.
3. Using Google Tag Manager option
In the home menu navigate to “Settings”, “Advanced”, “Code Injection”.
Replace GTM-XXXXXXXX for the code below with your GTM container ID. You can find this by logging into GTM. Copy and paste the code below into the ‘Header’ on the ‘Code Injection’ page.
<!– Google Tag Manager –>
<script>(function(w,d,s,l,i){w[l]=w[l]||[];w[l].push({‘gtm.start’:
new Date().getTime(),event:’gtm.js’});var f=d.getElementsByTagName(s)[0],
j=d.createElement(s),dl=l!=’dataLayer’?’&l=’+l:”;j.async=true;j.src=
‘https://www.googletagmanager.com/gtm.js?id=’+i+dl;f.parentNode.insertBefore(j,f);
})(window,document,’script’,’dataLayer’,’GTM-XXXXXXX’);</script>
<!– End Google Tag Manager –>
Then, replace GTM-XXXXXXXX for the code below with your GTM container ID. Then copy and paste the code below into the ‘Footer’ on the ‘Code Injection’ page.
<noscript><iframe src=”https://www.googletagmanager.com/ns.html?id=’GTM-XXXXXXX'”
height=”0″ width=”0″ style=”display:none;visibility:hidden”></iframe></noscript>
D. How to add Google Analytics tracking code on Shopify
1. Embedding tracking code
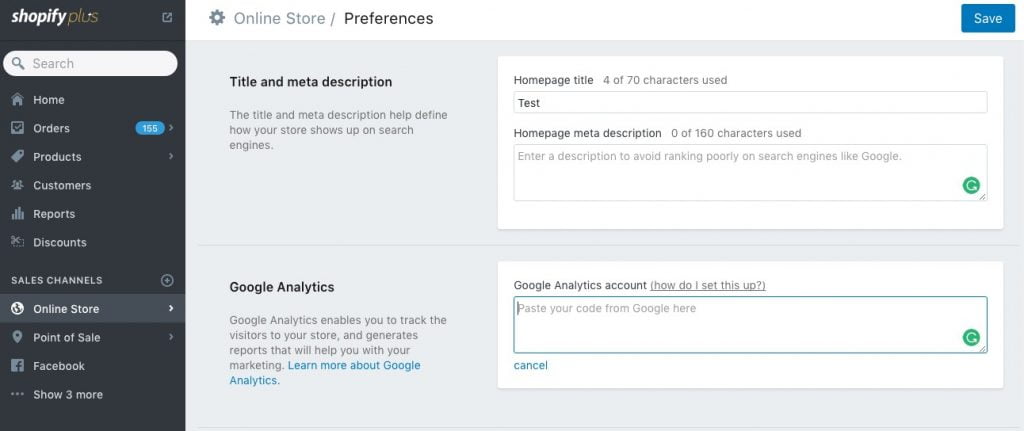
Open your Shopify ecommerce dashboard/admin, and then click “Online Store” and then click “Preferences”.
Now paste the Google Analytics Tracking Code in the Google Analytics account field.
Click “Save” and “Done”.
2. Using Google Tag Manager option
Install Google Tag Manager to get the code snippets that you will need to copy and paste into your Shopify store. Because Shopify uses templates, you only need to copy the snippets into the theme.liquid and checkout.liquid files.
If this is your first time installing Google Tag Manager, then use the installation steps provided by Google Tag Manager. Pause at the step where you are given two code snippets to add to your web pages, and then follow the instructions below.
In your Shopify admin, click “Online store”, and then click “Themes”.
In the theme drop-down, click “Edit Code”.
Copy the first code snippet from Google Tag Manager into the <head> tags of your theme.liquid and checkout.liquid code:
Copy the first code snippet from Google Tag Manager
In your Shopify admin, open your theme.liquid file.
Paste the code snippet as high in the <head> of the theme.liquid code as possible.
Open your checkout.liquid file.
Paste the code snippet as high in the <head> of the checkout.liquid code as possible.
Copy the second code snippet from the Google Tag Manager into the <body> tags of your theme.liquid and checkout.liquid code:
In your Shopify admin, open the theme.liquid page.
Paste the code snippet as high in the <body> of the theme.liquid page as possible.
Open the checkout.liquid page.
Paste the code snippet as high in the <body> of the checkout.liquid code as possible.
Click Save.